Now that we have established object structures and components, let’s take a look at custom assets. If you don’t want to use default configurations of, for example, workflows or diagrams, it is best to plan and implement them during the initial development stage. This means before installing the application and creating or importing objects.
Why Define Them Now?
If you make changes to assets such as workflows, diagrams, or comments after the package is installed and populated with data, the changes won’t affect existing objects. In such cases, you would need to take one of the following actions:
- Install the app in a new space.
- Delete all objects and recreate them.
- Delete the app (and therefore all associated objects) and reinstall it.
While reinstalling an app multiple times is often an unavoidable part of the process, you can save time by planning custom assets during the early stages of your package development.
Workflows
Workflows define the stages objects pass through and how they transition between states. These are especially useful for enforcing processes, such as reviews or approvals.
You must decide on:
- Workflow States: Define the stages your objects will go through.
- Transitions and Restrictions: Determine how objects can move between workflow states and whether transitions are restricted to certain roles.
Example: Recipe Manager App Workflow
- Workflow States: None, Working on, Discarded, Approved.
- Transitions:
- No workflow will be assigned to parent objects (for more information on object hierarchy, see 2. Define Object Types and Their Relations).
- Only the Recipe Owner (for more information on user relations, see 2. Define Object Types and Their Relations) can change the workflow state to Approved.
- Only the Best Cook can change the workflow state to Discarded.
Create a workflow diagram as a visual guide for users. Dawiso requires you to upload this diagram into the package during setup, so having this prepared will come in handy.
For our example, we will use the following diagram:
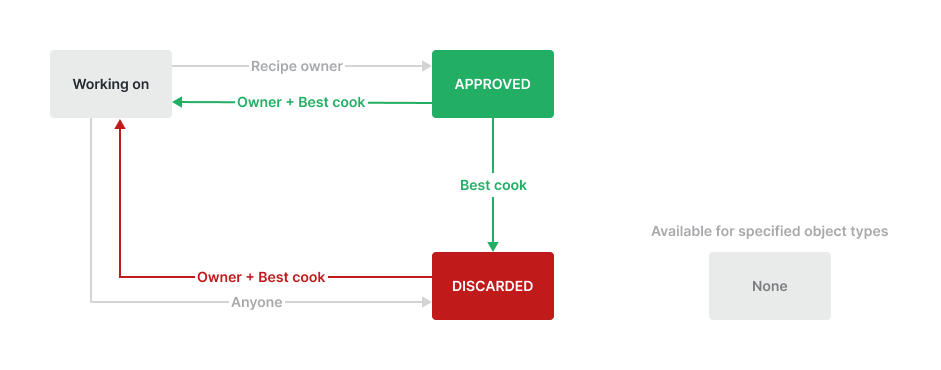 - The workflow states are represented as boxes.
- The arrows indicate the allowed transitions between these states.
- Each arrow is labeled to specify the users or roles who can trigger the transition. This visual representation helps clarify the flow and restrictions within the workflow, ensuring seamless implementation and understanding.
Next Phase: Implementation
With the application purpose, object types, and custom assets all planned out, we now have a comprehensive design for our application. This solid foundation will make the development phase smoother and ensure consistency throughout your package.
<— Back to: Decide on Attributes and Components Next: Developing an Application —>