When you add an object, you must select its object type, which determines what kind of attributes and data will be associated with that object.
Here’s the basic structure for defining an object type in JSON:
"objectTypes": [
    {
        "key": "",
        "name": "",
        "iconKey": "",
        "attributeTypes": [
            {
                "key": ""
            }
        ],
        /* "userRelationTypes": [
            {
                "key": ""
            }
        ], */
        // "tooltipAttributeTypeKey": "",
        // "features": [ ],
        "templates": { }
    }
],| Property | Purpose |
|---|---|
key | A unique identifier for the object type. The keys of created object types will have to be assigned in the applications asset. We’ll cover this more in detail in the last step. |
name | The display name of the object type in the UI, in the object header. |
iconKey | Key of the icon used as the object type’s icon. You can either define new icons in their own asset or use predefined icons from Settings > Configuration > Icons. |
attributeTypes | Specifies the attributes associated with this object type. Specifying attribute types allows to store data for this object type. |
tooltipAttributeTypeKey | Key of the attribute displayed in the object preview, which appears when hovering over an object link (e.g., in a list of objects). |
userRelationTypes | Specifies any user relations associated with this object type. |
features | Configures additional behaviors or visibility settings for the object type. See the full list of Object Type Features. If a feature is not specified, it defaults to false. |
templates | Configures the layouts of the page and object detail of the object type. |
Make sure to create one object type (commonly named app_overview) to serve as the default overview of the application within the space.
In the screenshot below, you can see what some of the properties configure:
We’ll break down the process of creating an object type into the following steps:
- Creating the object type (basic information)
- Assigning custom assets
- Defining object type features
- Configuring the page layout
A. Creating an Object Type
First, define the object type by specifying its key and name. This establishes the fundamental identity of the object within the package.
Example: Defining a “Recipe” Object Type
{
"key": "recipe",
"name": "Recipe"
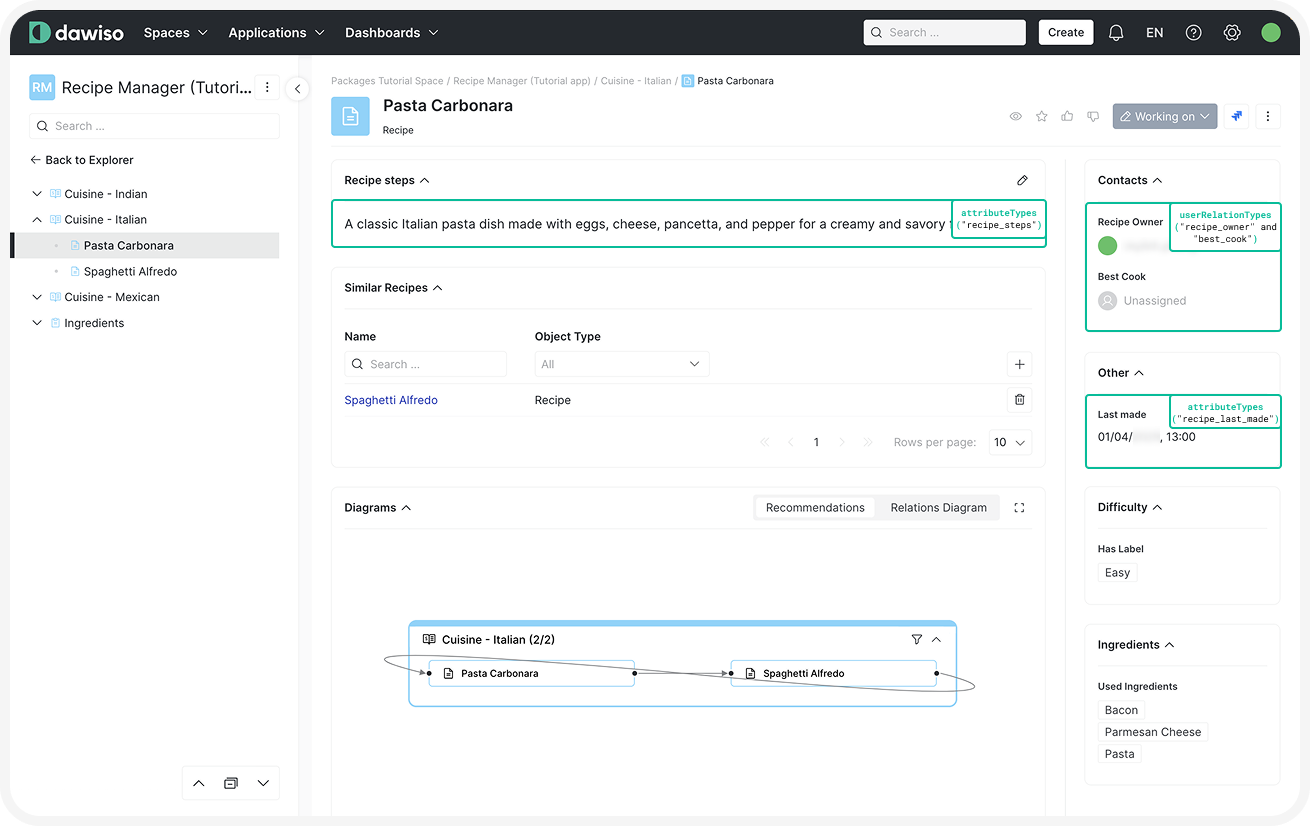
},Assigning Attributes and Relations
Once an object type is defined, we need to assign the necessary attributes and user relation types using an array of keys. This ensures that the object type can store the intended data (their display is configured using templates, see this section).
In addition to assigning attributes and relations, you can also specify their features. Features can be set in two different places:
- At the asset level (where relation types are initially defined): Features apply globally across all object types.
- At the object type level (in this section): Features apply only to this specific object type.
For example, for user relations, you can specify whether a relation allows multiple users ("isSingleValue": false) or only one ("isSingleValue": true). This can be set in the userRelationTypes asset for a global effect or here to apply for this specific object type.
If you are using core attributes or core user relations, make sure to assign them as well!
Example: Assigning Attributes and User Relations Types to the “Recipe” Object Type
In the screenshot below, you can see how attributes and user relations are used.
 Click here to hide the example.
{
“key”: “recipe”,
“name”: “Recipe”,
“iconKey”: “core_business_term”,
“attributeTypes”: [
{
“key”: “recipe_steps”
},
{
“key”: “recipe_last_made”
}
],
“userRelationTypes”: [
{
“key”: “recipe_owner”,
“isSingleValue”: false
},
{
“key”: “best_cook”,
“isSingleValue”: true
}
}
Assigning Custom Assets
If your package includes any custom assets, you must assign them to the relevant object types. One example is custom graphs, which are assigned using the graphDisplayLevels property.
Here’s a preview of the structure as it appears in the example package. However, since this is an advanced configuration topic, we’ll cover it in more detail in future articles.
{
    "key": "recipe",
    ...
    "graphDisplayLevels": [
        {
            "metamodelKey": "recommended",
            "displayLevelKey": "recipe"
        }
    ],
    ...
}
B. Defining Object Type Features
Define the value displayed in the object preview (when hovering over an object link) using the tooltipAttributeTypeKey property.
{
    "key": "recipe",
    ...
    "tooltipAttributeTypeKey": "recipe_steps",
    "features": [
        {
            "key": "create_without_concept",
            "value": true
        },
        {
            "key": "not_creatable_in_root",
            "value": true
        }
    ]
}
You can also use the features property to configure specific behaviors. In our example, the Recipe object type:
- Can be created without a concept stage.
- Must have a parent object and cannot be created as the top level of a hierarchy.
See the full list of object type features you can configure for your object type.
See how the final package comes together. Download the full example Recipe Manager application package here: Recipe Manager (Tutorial App).json
C. Configuring Object Type Templates
To finish setting up your object type, you need to configure the its layout using the templates property. To do so, continue to the 5.B Configure Object Type Templates article.