Microsoft Entra ID, formerly Azure Active Directory (Azure AD), is a cloud-based identity and access management service from Microsoft. It helps organizations manage user identities, application access, and permissions securely.
Dawiso integrates with Entra ID to provide:
- User and group synchronization: Automatically syncs users and groups from Entra ID to Dawiso, ensuring accurate data ownership assignments and user roles.
- Authentication: Enables secure, password-free access to Dawiso using Microsoft Login with OpenID Connect.
This integration simplifies user management, enhances security, and ensures a seamless onboarding experience. In this article, you will find details about the synchronization and authentication processes, including practical examples and architectural diagrams.
Synchronization of users and user groups
To use Dawiso effectively, it is recommended to prepare a complete list of users in advance, before their first login. This ensures that data owners can be assigned to objects even if they have not logged in yet.
Example
Your task is to assign your colleague Peter as the data owner for an object called Cool Report in Dawiso. Data ownership is critical for providing users with the necessary context and accountability when working with this object.
However, if the organization’s user list has not been synchronized, Peter’s account won’t exist in Dawiso’s database, making it impossible to assign him as the data owner. The only alternative is to wait for Peter to log in to Dawiso, but this approach has its risks:
- Peter may never log in.
- You might forget to assign the object to Peter later.
To avoid such issues, all users should be synchronized in advance (and periodically) from the customer’s Entra ID.
The diagram below illustrates the high-level process for synchronizing with Entra ID.

The following items are synchronized between Entra ID and Dawiso:
- Users: First and last name, email, job title, phone, display name, login, and license (application roles, viewer, contributor, admin) based on their assignment in a customer’s Entra ID.
- User groups: Customers can choose to mirror specific Entra ID user groups to Dawiso. This would mean that when a user is assigned to an Entra ID group, they are automatically added to the corresponding Dawiso user group.
Example
| Entra ID Group | Assigned Users | Actions in Dawiso After Synchronization | Permissions in Dawiso |
|---|---|---|---|
| Viewers | Joe, Melinda | Create Dawiso Viewer accounts for Joe and Melinda. | Can only read content |
| Contributors | Thomas | Create a Dawiso Contributor account for Thomas. | Can read and edit content |
| Admins | Jane | Create a Dawiso Admin account for Jane. | Full permissions |
| Data stewards | Jane, Thomas | Create a Dawiso Data Stewards group and assign Jane and Thomas to it. | Data steward permissions |
Notes:
- Synchronization is scheduled daily.
- Any changes in Entra ID (e.g., adding or deleting users) are reflected in the next synchronization run.
- After synchronization, all users can log in to Dawiso with their assigned roles.
Authentication Process
Authentication allows users to securely sign in to the Dawiso application. Dawiso does not store user passwords. Instead, it utilizes OpenID Connect for authentication, enabling users to sign in through Microsoft Login. This ensures secure and seamless access without compromising user credentials.
For more details on how OpenID Connect operates, refer to the high-level diagram below or consult Microsoft’s official documentation.
Create connection between Dawiso and Microsoft Entra ID
To establish a trust relationship between Dawiso and the Microsoft identity platform, you need to register Dawiso as a new application in your Microsoft Entra ID and assign it necessary permissions.
Register an application
To register your Dawiso instance as a new application, follow these steps:
-
In your Microsoft Entra admin center, in the left navigation menu, open to Applications and select App registrations.
-
Add a new registration, or select an existing one. You will be redirected to the Overview page, where you can also find the Client and Tenant IDs.
-
Under the Manage section on the left, select Authentication.
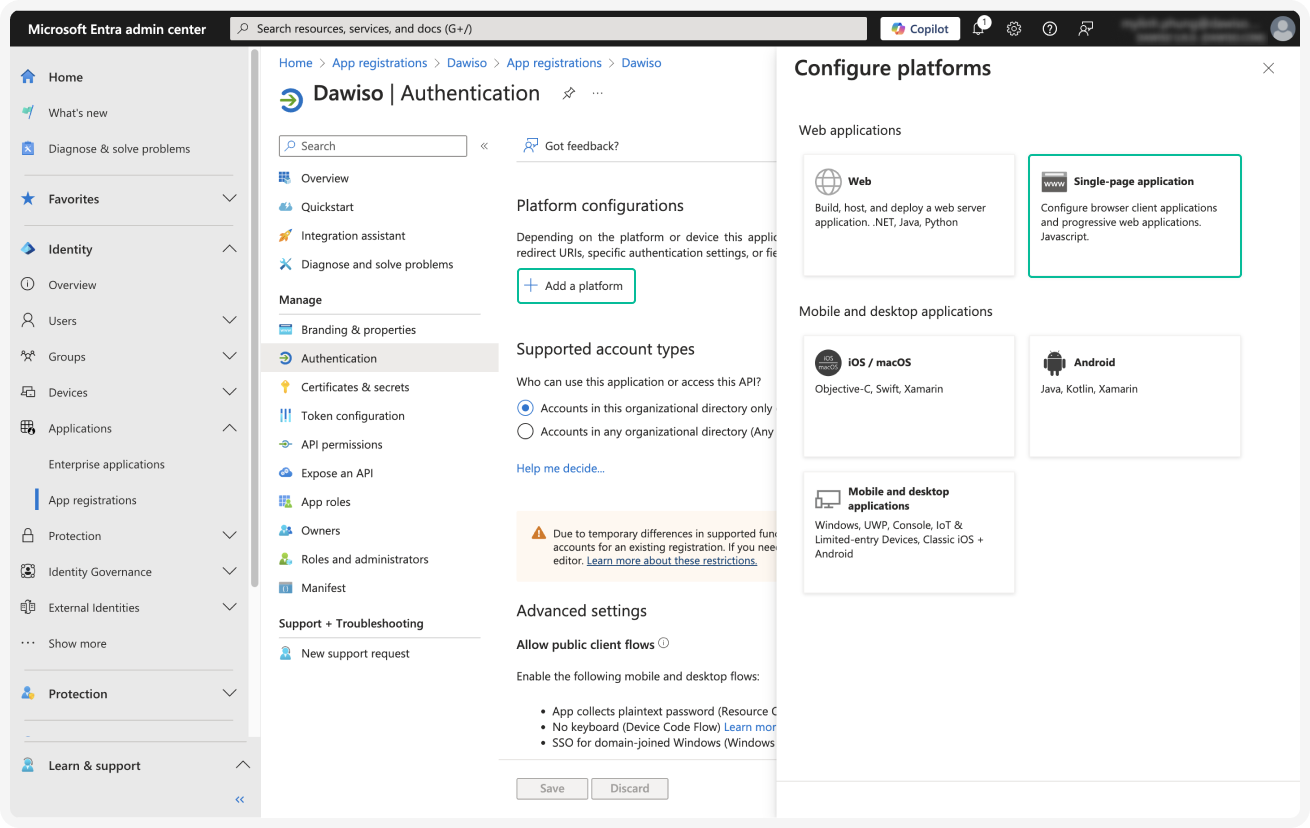
-
Click + Add a platform and select Single-page application.
-
Set the Redirect URI of the application to
https://[your_instance_name].dawiso.cloud/sso/signin. -
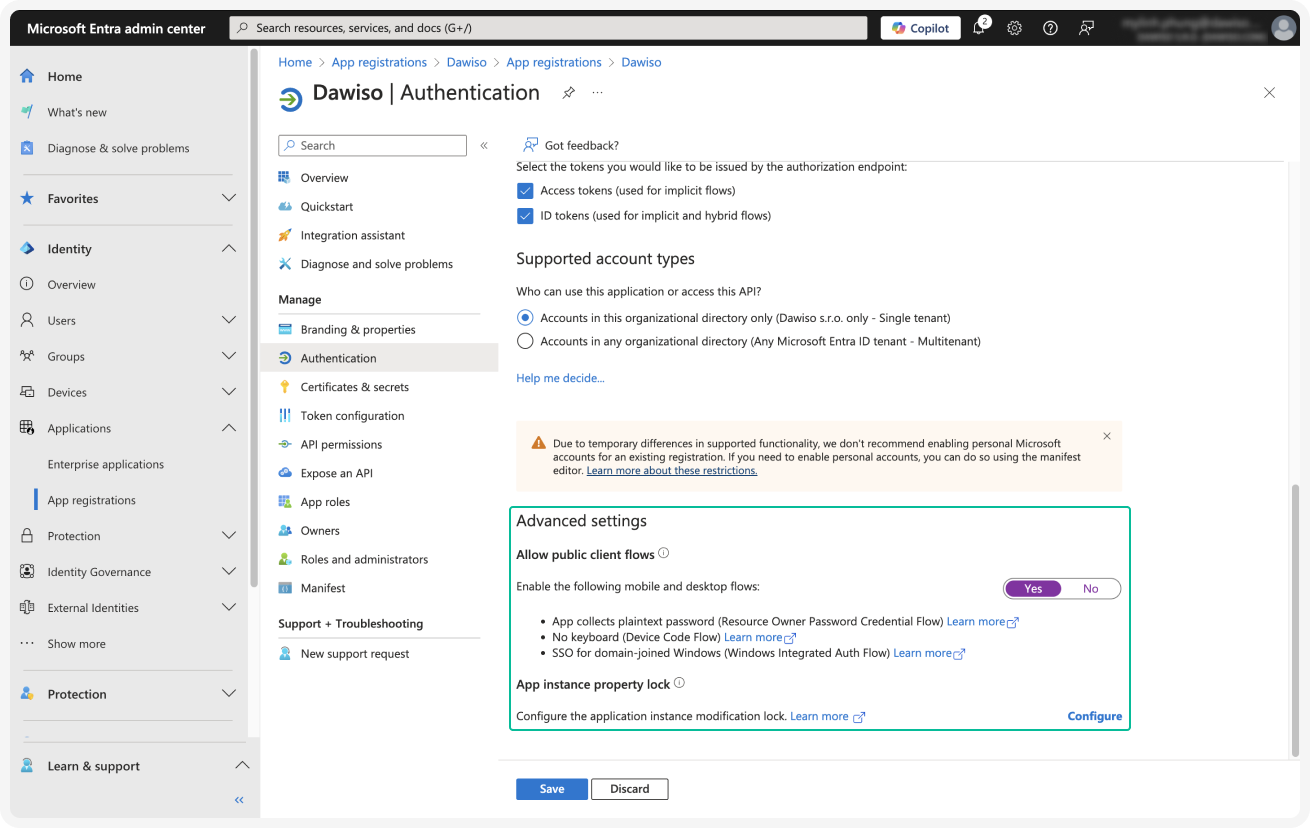
Under the Grant types section, check the following boxes:
- Access tokens (used for implicit flows)
- ID tokens (used for implicit and hybrid flows)
 7. Click Configure to finish the setup.
8. On the Authentication page, scroll down to Advanced settings. Change the Allow public client flows option to Yes and Save.
7. Click Configure to finish the setup.
8. On the Authentication page, scroll down to Advanced settings. Change the Allow public client flows option to Yes and Save.
Synchronize and grant API permissions
Before creating a new client secret, first set the necessary API permissions for the application.
- In your Microsoft Entra admin center, in the left navigation menu, scroll down to Applications and select App registrations.
- Add a new registration, or select an existing one.
- Under the Manage section on the left, select API Permissions.
- Click ✓ Grant admin consent for [your application]. Admin consent is required to grant elevated permissions for listing users from Microsoft Entra.
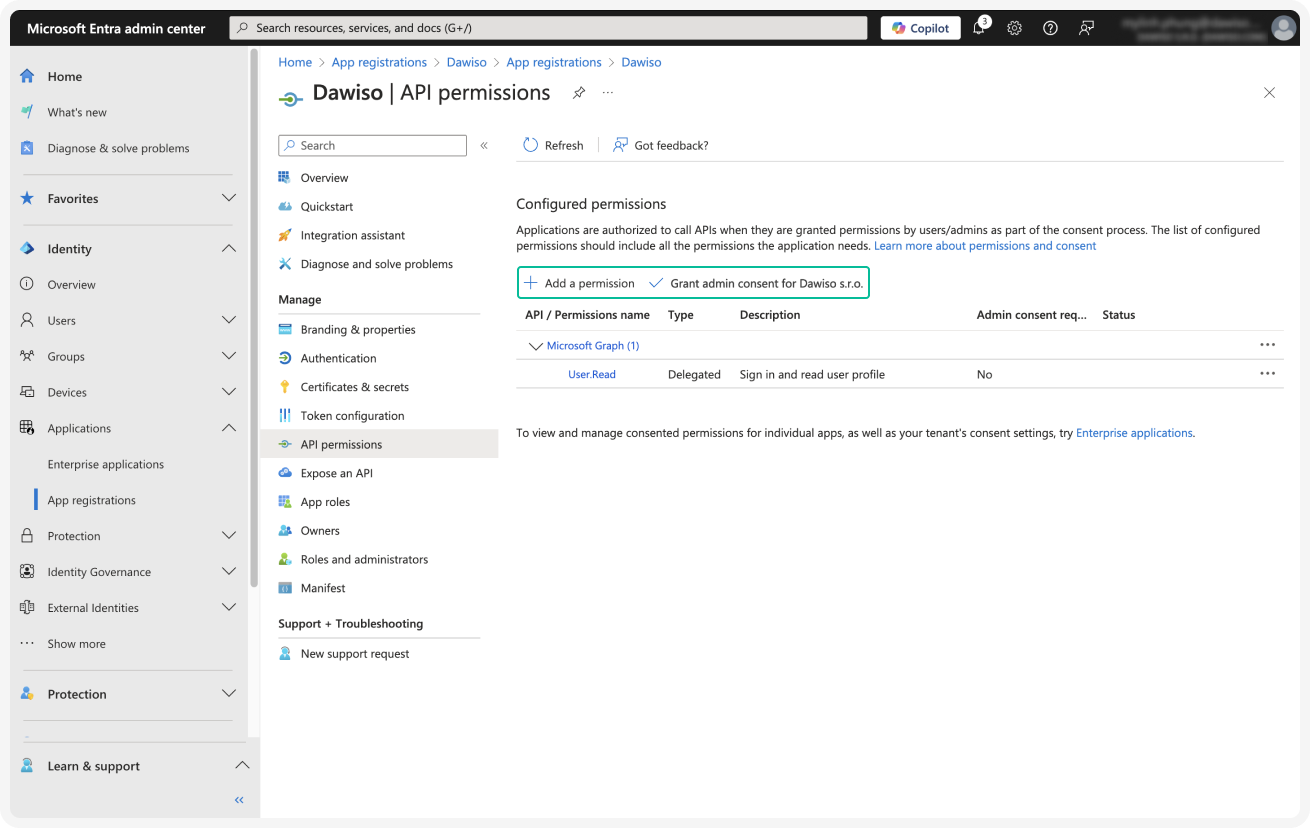
- Click + Add a permission and select the Microsoft GraphAPI. Select the following delegated and application permissions:
- Delegated permissions:
User.ReadUser.ReadBasic.All
- Application permissions(admin consent needed):
GroupMember.Read.AllUser.Read.All
- Delegated permissions:
Obtain client secret
Once you are done with the previous steps, retrieve the Microsoft Entra ID client secret.
- In your Microsoft Entra admin center, in the left navigation menu, scroll down to Applications and select App registrations.
- Add a new registration, or select an existing one. You will be redirected to the Overview page, where you can also find the Client and Tenant IDs.
- Under the Manage section on the left, select Certificates & secrets.
- Click + New client secret.
- Enter a description and set the expiration date.
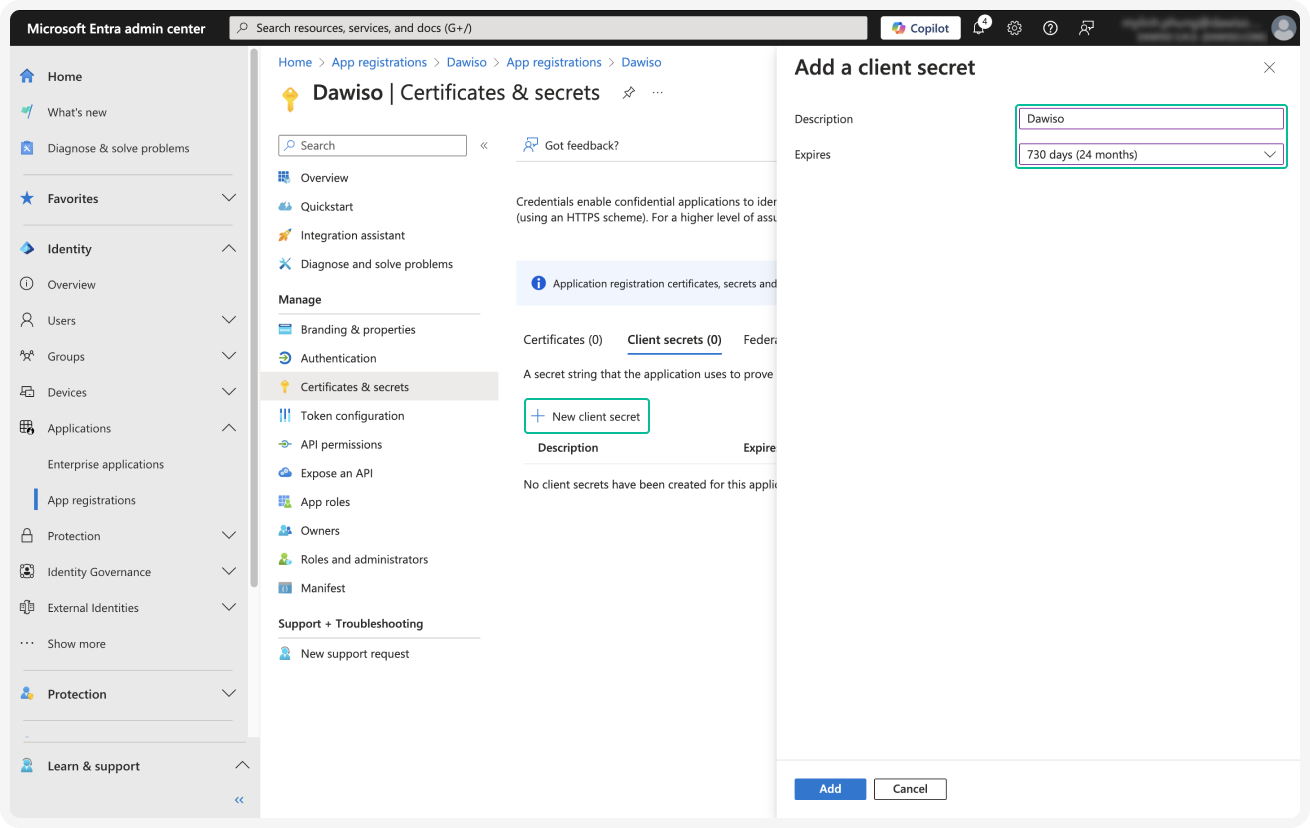
- Once created, immediately copy the Value field and store somewhere safe. The secret will be displayed only once, right after creation.
Microsoft Entra SSO setup
To set up your Microsoft Entra SSO, prepare the following information for the Dawiso Customer Success team:
| Required information | Description |
|---|---|
| Client ID | Unique identifier for the registered application in Microsoft Entra ID (also called Application ID). |
| Tenant ID | Unique identifier for your Microsoft Entra ID tenant (also called Directory ID). |
| Client Secret | A secure key used for authentication between Dawiso and Microsoft Entra ID. |
| Admin Group | Object ID of the Microsoft Entra ID group assigned admin access. |
| Contributor Group | Object ID of the Microsoft Entra ID group assigned contributor access. |
| Viewer Group | Object ID of the Microsoft Entra ID group assigned viewer access. |
Client and tenant ID
Client and tenant ID are created during app registration in Microsoft Entra ID. For more information on how to register an application, refer to Microsoft Entra Synchronization.
Found in Microsoft Entra ID (previously Azure Active Directory) > App Registrations > (All applications) > Your App Registration > Overview.
Group information
Finf group information in Microsoft Entra ID under Groups > All Groups > Object ID.